Developing a $5 ESP32 WiFi Security Camera With Motion Detection / OTA Encryption / Remote Access [In Progress]
Security cameras are expensive, and once you make the upfront investment to purchase some, you’re practically stuck in the company’s ecosystem. Whether it’s Ring, Eufy, Nest, etc, you’re subject to their app, server uptime, and more worryingly their security implementation. In addition to this, the multi-hundred dollar investment and monthly subscription fees are likely over the top for someone who just wants to know when their dog goes outside.
Another ongoing project I’ve started requires a high-quality camera with lots of RT processing, but during my research, I came across the ESP32 Cam. This module is a low-cost microcontroller that combines the ESP32-S Chip and OV2640 Camera. Costing $5-$10 depending on where you purchase, this module supports a breadth of resolutions up to 1600x1200, numerous image formats such as JPEG/RGB565, and an onboard LED for flash.
It’s important to keep in mind that the ESP32 CAM doesn’t have anywhere near the processing power of a SBC, making streaming the higher resolutions at a decent frame rate practically unfeasible. If you look for ESP32 Cam Security projects, you won’t find many. The projects you come across are more or less modified versions of the esp32-cam-webserver project and don’t feature proper remote access, motion detection, clip saving, etc.
The end-goal here was to combine this low-cost chip and my weak low-level programming skillset, with my other stronger skillsets such as web development and server architecture, to create a practical security camera that can detect motion, record it, transmit it securely, notify devices, and provide them access, while also making everything intuitive, configurable, and user-friendly(or at least tinkerer-friendly).
Table of Contents
Motion Detection
Low-level programming isn’t something I’m too accustomed to, since I’ve mainly been working with web development(JS/PHP) and Java/Python for the last 12 years. I started the project by attempting to write my own motion detection based on RGB, however, the processing seemed to be too slow and the detection was mediocre at best. This was done by calculating the distance between pixels of the current frame and the last frame in terms of RGB, and was defined as sqrt((R^2-R1)^2+(G^2-G1)^2+(B^2-B1)^2).
This was too slow for a multitude of reasons:
- Every frame had to be decoded from JPEG to raw RGB values for analyzing
- Every single pixel being analyzed required 7 math operations
- Even the smallest image resolution, 160x120, is 19200 pixels per frame to be processed and plugged into that formula
I began looking into others’ research for motion detection on the module, and ended up piecing multiple parts of my findings together. EloquentArduino had a great post on his motion detection method, which talks about downsampling the frame before trying to detect motion. The caveat here is he uses grayscale and calculates the difference of the single value between frames to detect motion, but we need an RGB solution for more reasons later in the post.
In the comments of that post, someone shared code that bitluni(a popular gadget Youtuber) wrote to efficiently grab RGB values out of the RGB565 format supported by the camera. From there, we can still calculate grayscale for the motion detection and downsample, by adding together chunks of R/G/B and dividing by the number of pixels in the chunk.
This strategy ended up working well, essentially the method boils down to:
- Capture a 160x120 RGB565 image
- Downsample the image by a factor of 4, to 40x30
- For each pixel of the downsampled image, calculate the grayscale of the pixel
- Calculate the change between the current and last grayscale number
- If the change is greater than X(a configurable variable), assume that this pixel had changed
- Sum all the pixels that have changed, and if they account for Y(a configurable variable)% of the downsampled resolution, then motion is detected.
Problems
After refactoring some code, I noticed I must have changed something about the way the motion detection was working. It no longer did as good of a job, and it seemed that the bottom portion of the FOV of the camera wouldn’t detect anything. The most tedious part of projects like this is diagnosing becomes extremely difficult since I can’t just view the camera feed, set breakpoints and check variables during runtime, or save significant amounts of data like images due to memory.
In order to diagnose why the motion detection went wonky, I would have to be able to view the grayscale matrix that is being used to detect motion. I threw up a webserver on the module, which also served an endpoint /instant. This HTTP endpoint served raw binary of the last grayscale matrix processed.
After that, I wrote a webpage locally to pull the image from this endpoint and update a set amount of times per second. Keep in mind, we aren’t receiving JPEG, we’re receiving the binary values of grayscale for all pixels in the matrix. Because of this, I had to manually draw the response of the HTTP request onto a Canvas element.
If I messed up in writing the tool, the image was wonky, but even if I did it perfectly, the grayscale matrix the server was using was also wonky(causing the issues), meaning diagnosing the problem at hand took a frustrating hour or two. Eventually I was receiving a corrupt looking feed with scattered pixels on the bottom third, and I knew that I must have gotten the webpage to properly render what the module was seeing, considering motion didn’t work at all towards the bottom of the camera.
The issue could be pinpointed down to two lines of code:
int i = ((y*DOWNSIZE_HEIGHT)+x); => int i = ((y*DOWNSIZE_WIDTH)+x);
This was how I was converting x/y to an index, when I should have been multiplying y by the WIDTH and not the height, causing the bottom of the image to not render properly.
curSnap[i] = rr+gg+bb / 3; => curSnap[i] = (rr+gg+bb) / 3;
This code was responsible for assigning the pixel array’s grayscale value, however a lack of parenthesis in the code above would result in an interpretation such as rr + gg + (bb/3)
With the changes made, the module was analyzing the proper grayscale matrix, and the webpage evidenced this as shown above.
Networking
With the bulk of motion detection down, it was time to move on to transferring the feed to a server for more processing and features.
I’d made it so that any motion triggered a recording event lasting a configurable amount of seconds. When recording, we want a resolution much larger than what we use for motion detection(160x120). 640x480 seemed acceptable, but transferring this amount of data while concurrently recording is problematic with the little processing power we have. RGB565 is 2 bytes, meaning each frame would be 160*120*2 = 38,400 bytes.
Even if we could find a way to transfer this much data feasibly, we would need to encrypt it as well, and
I’ve found that the maximum HTTPS payload size is 16KB on the ESP32, making transporting a payload of this size impossible. In order to avoid a 1FPS recording or possibly lower, we need to switch to the JPEG format when recording for a lower payload size. This is the more logical approach anyways considering we don’t need to do any raw pixel color processing on the recording frames.
The ESP32 Cam supports all settings being changed after initialization, except format. Because of this, I had to implement a workaround that physically powercycles the camera and reinitializes it in order to change the format.
Even with the smaller payload size we would now be using thanks to JPEG, getting it securely to the server still presented a challenge. Thankfully, the module supports a few cryptographic algorithms accelerated through its hardware including AES, SHA, and RSA primitives.
I’d wanted to make the transferred feed resilient to MITM(Man-In-The-Middle) attacks, so anything such as a symmetric key initially shared, or even calculated through something such as a Diffie Hellman Key Exchange would not work. I also wanted to avoid hardcoding a secret, as that just isn’t an ideal solution to me. In addition, the asymmetric cryptography support on the module, as well as its documentation, seemed extremely lacking, but then I’d remembered that we can make HTTPS requests < 16KB.
With this in mind, the ideal solution to me was to use HTTPS solely for the module to obtain an AES key from the server. It would then use this key to encrypt every single frame taken, which can then be sent over HTTP which is faster and does not have a 16KB limit. In the future, this could be made even more efficient by sending the data directly over a TCP socket to avoid the overhead and waste from the HTTP protocol.
The first thing to do was get a webserver going with HTTPS/TLS. Because I have so many websites and services, I virtual host them all on my one large server. Because of this, getting another webserver up is just a matter of proxy passing through NGINX. In order to get TLS, I use Lets Encrypt to issue my domain a certificate, which I then have the module accept the hardcoded root certificate for.
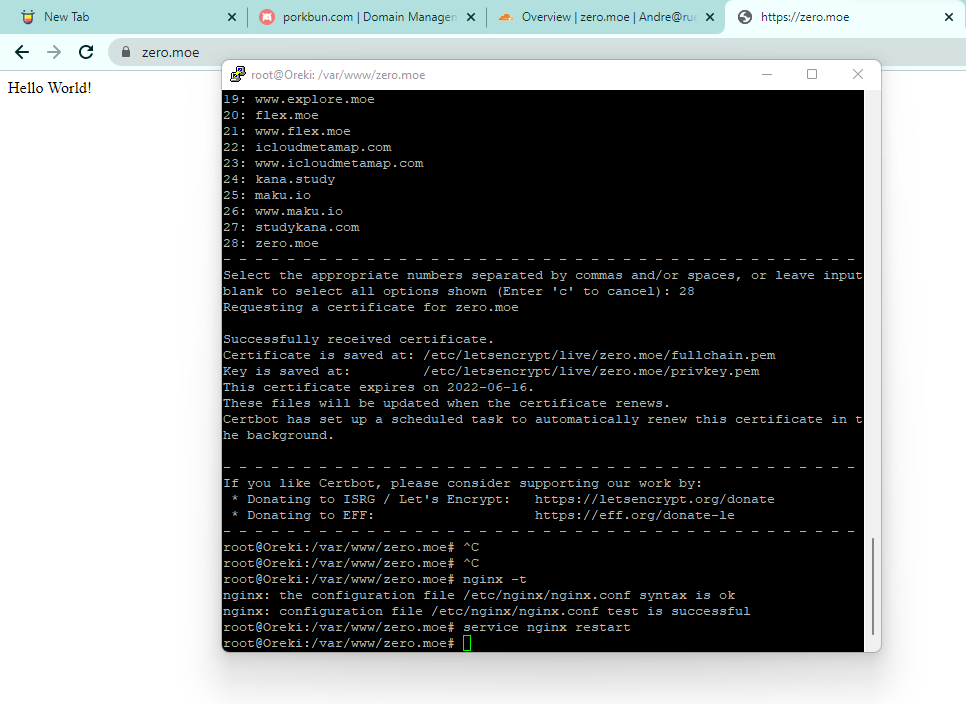
I chose zero.moe as my domain because it’s short, sweet, and well, moe.
The webserver I wrote was a pretty simple ExpressJS server with two endpoints
/api/key-requestGiven a unique identifier, will create a 128 bit secret and respond with it while also storing the identifier/secret relationship/api/secure-uploadGiven a unique identifier and binary data, will decrypt the data using the stored key derived from the identifier, and store the data(image) into a folder
Problems
Writing the networking code for just transferring the frames over HTTP introduced a barrage of issues, and I think reading more about issues programmer’s go through or struggled with can be sympathizing and educational.
Firstly, I struggled to get the webserver to understand the multipart POST request including the encrypted image file that the module was sending. This came down to what can be called “weird design” in the protocol. It’s important to note here that with the low-level code I’m working with, all the HTTP requests have to be written by hand. This means printing out each line of the protocol and manually calculating the request data length for the Content-Length header.
This is an example of a multipart form request my code was making minus the binary body data:
POST /api/secure-upload HTTP/1.1
Connection: upgrade
Host: zero.moe
Content-Length: 478
Content-Type: multipart/form-data; boundary=--------------------------619265141083404666382729

----------------------------619265141083404666382729
Content-Disposition: form-data; name="imageFile"; filename="a.bin"
Content-Type: application/octet-stream

DATA HERE
----------------------------619265141083404666382729--
Meanwhile, here is an example of the request I should have been making:
POST /api/secure-upload HTTP/1.1
Connection: upgrade
Host: zero.moe
Content-Length: 478
Content-Type: multipart/form-data; boundary=----------------------------619265141083404666382729

----------------------------619265141083404666382729
Content-Disposition: form-data; name="imageFile"; filename="a.bin"
Content-Type: application/octet-stream

DATA HERE
----------------------------619265141083404666382729--
Don’t see the difference? I didn’t either for almost two hours. The difference however is when specifying the boundary in the Content-Type header, you use two less hyphens(-) than the boundaries used to separate data. Most webservers will not interpret any of the data in the request if even a single character is off.
Once the webserver was seeing the posted binary data, it was unable to decrypt it. In order to make sure the encryption/decryption standards were the same, I hardcoded a 128 bit AES key and had the Arduino module and NodeJS server both encrypt “Just Testing”. The result was different not only on both platforms but on a third web platform as well.
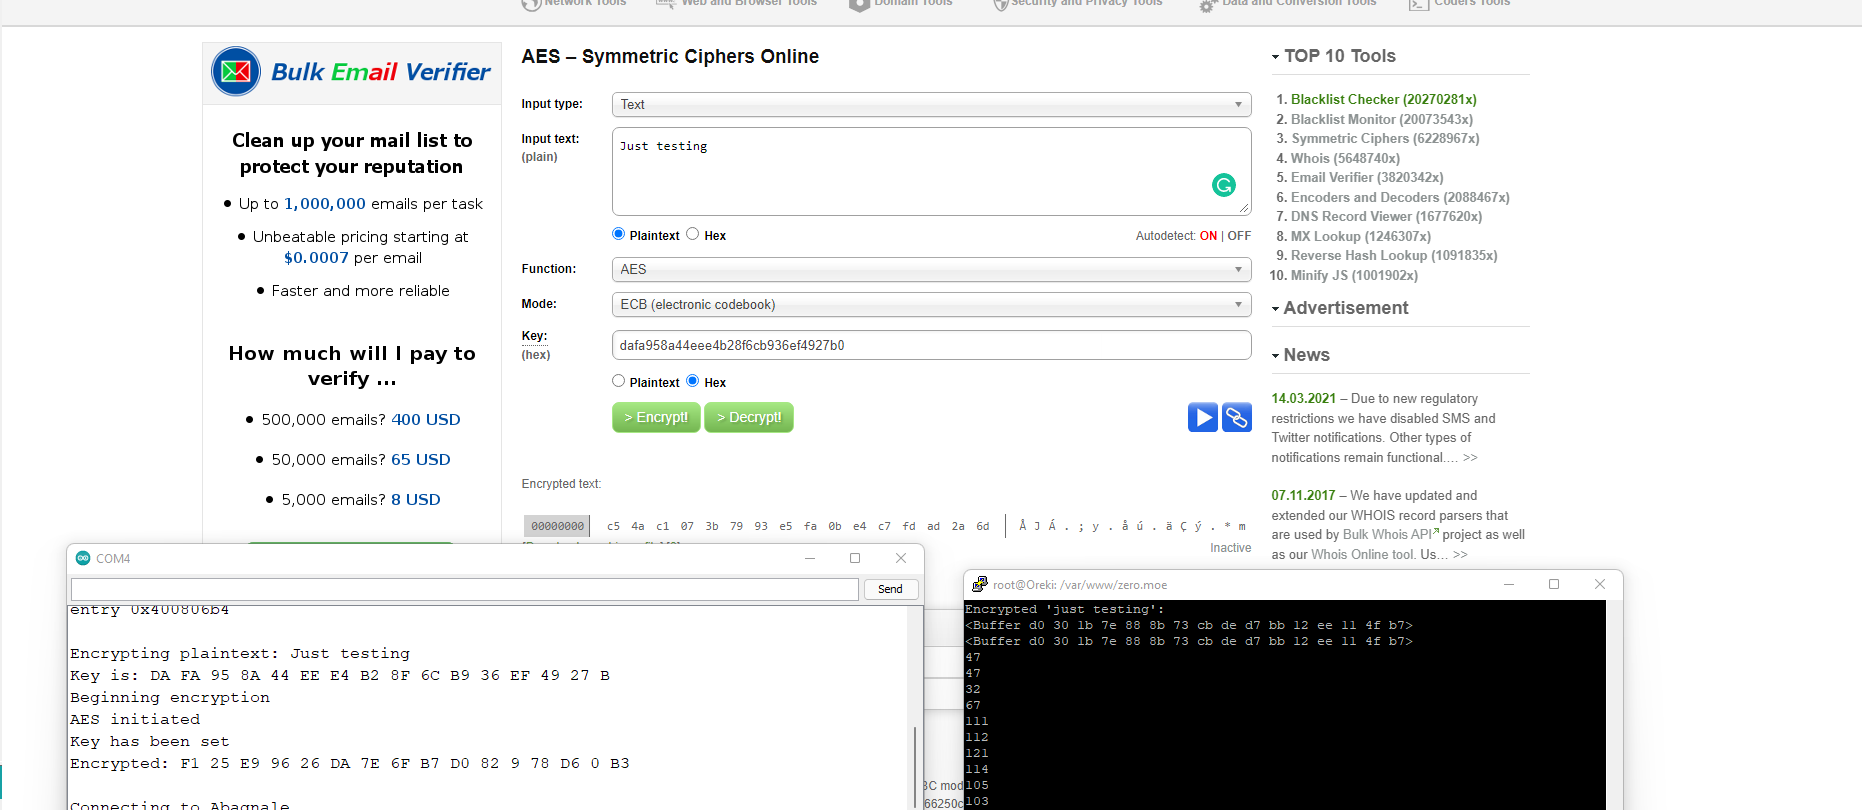
After a thorough amount of testing, I found multiple problems:
- Padding was not consistent, AES is a block cipher so plaintext has to have some sort of specified padding to reach the block lengths, and there are multiple ways to do this
- Library specific quirks, NodeJS’s crypto library will add an IV to your cipher by default even without one being specified, you must specifically specify a 0 length IV to disable this
Once these issues were resolved, the server was successfully decrypting the data, but the issue did not stop there.

The images were corrupt after being decrypted, but since the decryption had gone through properly, and we know that image data is correct from our image serving endpoint, I’d known that something must have been wrong with the encryption code.
The function that encrypts with AES on the ESP32 Cam is esp_aes_crypt_ecb, which takes in a 16 byte input and writes out the encrypted 16 bytes to a given variable. Since I was encrypting payloads multitudes larger, I’d written code that used two large byte arrays and pointer arithmetic to properly chunk the data and write it in the proper places. This pointer arithmetic is where my error had occurred(my amateur C skills coming into play), and after rewriting it, I was finally properly encrypting and decrypting images.
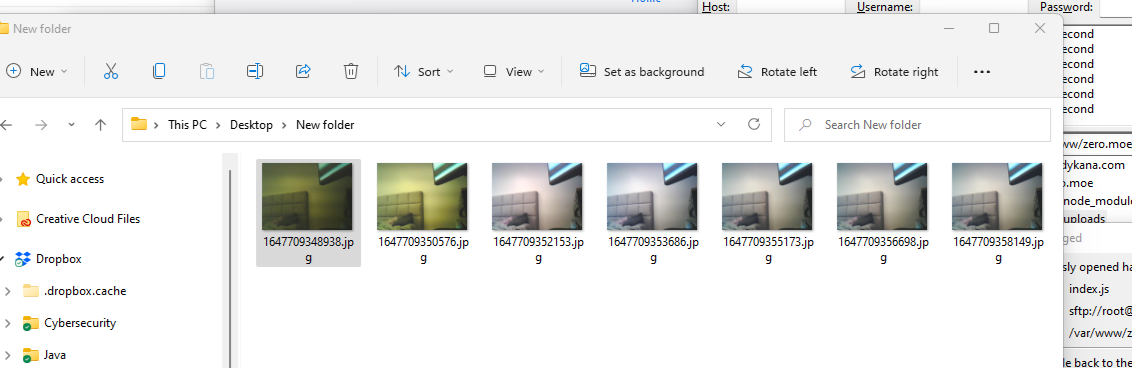
I’d noticed that the initially received images had a strong yellow tint, and believe this was due to the fact that I had to power cycle the camera after switching formats for recording. Since it was turning on again, it had not had the time to auto-adjust things such as white balance, exposure, etc. Because the camera library did not have any easy ways to access current sensor data, caching it and reapplying it after the power cycle was out of the question. In order to overcome this, I set the white balance to a semi-neutral value just for when recording.
Better Control
Now that I was properly receiving motion events(at least in terms of images) on the server, I thought it would be a good time to fine tune the motion detection. As I described earlier, motion detection works in terms of the amount of blocks changed relative to the total blocks, as well as the sensitivity factor that constitutes a “block change”. On the device, I refer to these as CHANGE_SENSITIVITY, being the % change of the grayscale value to constitute a block change, and SIZE_SENSITIVITY, being the % of blocks changed to constitute motion.
In order to find the sweetspot for motion detection, I needed to control these variables while testing motion rather than hardcoding values, reflashing, and retesting. I would also have to view what I refer to as the EBR(Effective Block Ratio) live, because when the EBR >= SIZE_SENSTIIVITY, motion is assumed.
I threw together a page based off my previous image viewing page and added controls that allowed me to change variables live on the module. This means that I had to add two more endpoints to the webserver running on the module, /debug-info which gives live server information comma delimited, and /change-settings which allows the SIZE_SENTIVITY/CHANGE_SENSITIVITY to be changed on the fly, as well as toggle on and off recording.
This ended up looking something like this:
Adding Structure
At this point in the project, I was almost three days in from when I started. The nuts and bolts have basically been accomplished: motion detection, OTA encryption, configurability. It may not seem like it, but I skipped over a large amount of intricate details to avoid bloating this blog and tried to keep the explanations at a high-level. Although it only had taken me < 3 days to accomplish what’s been written so far, I easily was putting out 10-14 hours each of the days.
Now that the blog is caught up, I can start working on polishing out the project which includes many things
- Converting the image series into a video on the server-side
- Using an SMS API to text configured users motion alerts, linked with video footage
- Module should create it’s own network that a user can initially connect to, then spin a user friendly webserver that prompts the user for WiFi credentials and other setup features, while persisting the data (captive portal)
- Implement protection in webserver to ignore devices that don’t have a configurable secret header
- Consider switching motion detection algorithm to use RGB/HSL difference rather than grayscale
My personal objective here is that any tinkerer can setup their webserver, flash the code onto any ESP32 CAM, follow a < 2min setup process(WiFi credentials / Motion settings / TLS Public Key / Server secret), and seamlessly have integrated a 5$ motion detecting camera that’s configurable on the network at any time.
Onboard Front-end
I’d wanted the webserver that would be spun up by the security camera to be extremely sleek and user-friendly. This site would act as the endpoint to configure the device initially, as well as monitor it going forward.
This essentially means that the previous endpoints I’d used in the control tool, /debug-info and /change-settings would be changed, and that control page itself would be redone completely. The earlier control page was written statically, but I chose React this time around since I would be making multiple pages, and wanted to make it a bit nicer. This is how it turned out:
I’m the type of developer that doesn’t like to use third party libraries for styling or animations, or really any components. I prefer this because it gives me full control over the components I’m creating, as well as makes any sort of debugging easier. The downside is that making things like that smooth, responsive, and collapsable navigation bar take me a bit longer than just importing some package.
Also, I try to design all my sites in a way that fit all resolutions, making them just as pretty on mobile.
Onboard Back-end
Now that the React Front-End has been taken as far as it can be made without having a backend to call, it’s time to get started. Because more endpoints are likely going to be introduced, it’s better to throw away the two old endpoints /debug-info and /change-settings, and introduce new JSON supporting endpoints on a /api path. This way, the webserver will just serve the static directory for anything that isn’t /api.
It’s also now the time for the ESP32 Security Cam to start persisting data, such as WiFi credentials, using the Preferences Library. Also, in the event that it cannot connect, it must create it’s own WiFi network with a captive portal to serve the webserver.
| File | SHA-256 Checksum | Proof |
|---|---|---|
| Article File | 4430124fbcd13030977780c4894c23b9dcedd8b47f37fbb62a485b0c3f9d25ac | etherscan.io transaction link |